.....what about two more pictures of my blanket to be????


Some of you asked me how the "dots" ( I call them "rice grains"!!!) can pop out in this way, so I thought it will be nice if I show you how this happens!!!! Happy about that??? Yes, I imagine so!


Some of you asked me how the "dots" ( I call them "rice grains"!!!) can pop out in this way, so I thought it will be nice if I show you how this happens!!!! Happy about that??? Yes, I imagine so!

Collect just few things :
+ hook
+ yarn in different colours
+ scissors
+ tapestry needle
This is the chart (american crochet terminology), drawn by myself (!!!!!!) for the first two rows :


Your foundation chain will have these characteristics :
- chain 4, add as many as you like groups of "chain 3". For example : chain 4, then chain 150 (=50 groups of "chain 3"!!). In total, you will have 154 chains for your foundation chain!!!
- After having the right number of chains, you have to : chain 1 + chain 2 (that is your first chain-2 space where you are going to wrap the stitches of your first shell!!!!) + 1 SC in the 7th chain from the hook (look at the above chart, please!!!). Repeat chain 2 + 1 SC till the end. Follow the photo tutorial !!!
Choose the colour you would love to start with and make a slip knot.
Chain 20 stitches

Chain 2 more (total : 22 stitches) and make a single crochet (or SC) in the 7th stitch from the hook (that is the previous stitch 16 on the foundation chain!)


Now, chain 2 ...

... skip 2 stitches of the foundation chain and work 1 SC in the 3rd stitch (that is the previous 13 stitch of your foundation chain!)


Again : chain 2, skip 2, SC in third stitch (previous #10!)

Repeat this scheme other 3 times (in previous # 7, 4 and 1 stitches of the foundation chain. See chart to have a better idea of what I'm trying to show you!), till the end of the chain

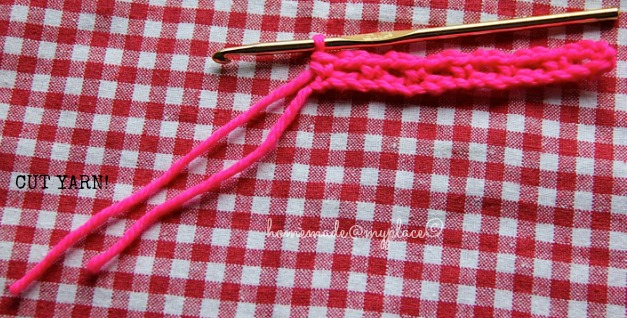
Cut the yarn
and fasten off! Choose a new colour to start
Row 1 :
first make a slip knot with the new colour on the hook

attach the yarn in the first chain-2 space with a SC and chain 3

in the same space work 2 double crochets ( or DC) (you wrap them around the stitches forming the chain-2 space!)

and chain 1

In the following chain-2 space : work 3 DCs and chain 1

At this point, you should notice your first "DOT"between the 2 shells!!!! This dot (and the other ones that will follow) is not other than your first single crochet of your work!!!!!! Ok???? :oD
Repeat other 4 times the scheme : 3 DCs + chain 1

To complete this row, chain 3 more stitches

and insert the hook in the last "dot" (shown with the tapestry needle)

make a slip stitch in the "dot" , cut the yarn and fasten off

Row 2 :
choose a new colour! Make a slip knot

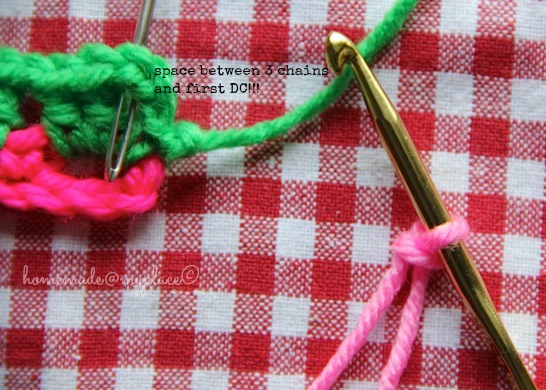
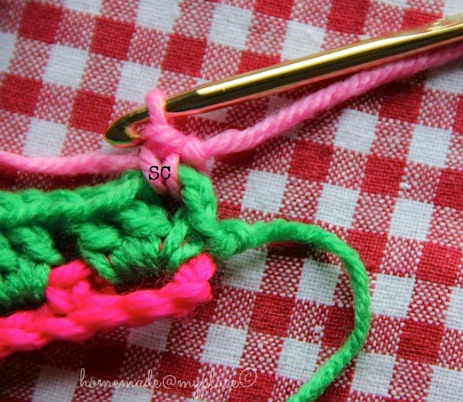
and attach the yarn with a SC in between the previous first 3 chains and the first DC


Chain 2

Work a SC in chain-1 space

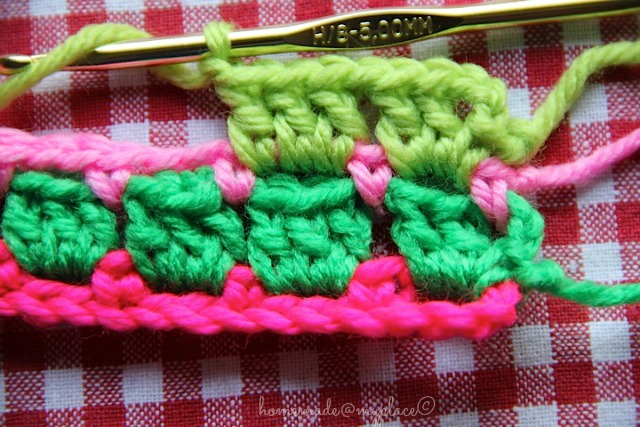
Repeat : chain 2 + 1 SC until the end of the row


Cut yarn and fasten off!
Row 3 :
choose a new colour and repeat what you have done for row 1


Row 4 :
change colour and this time repeat the complete scheme of row 2


Row 5 :
change colour and see row 1 and row 3 !!!!

......and on and on and on.......as you wish !!!!!!!!!!!
I think that this is a very easy pattern and I love the fact that you crochet always in the front of your work!
Please, if you have any trouble/question don't hesitate to contact me or just leave a comment at the end of this post! Thank you !
xxxx Alessandra
Using this stitch, you can crochet a GLOBETROTTER BLANKET !!!! Try and tell me !!!!! ;oD
Today links : Link your Stuff! and Craft Schooling Sunday See you there!!!!
Very nice tutorial Ale - thanks for sharing it. :)
ReplyDeleteThat written chart looks great! Fabulous tutorial!
ReplyDeleteKate :}
Those dots are so cute, and your blanket looks great!
ReplyDeleteLovely tutorial - thank you for posting it. I'm keen to give it a go :)
ReplyDeleteawesome step by step guide. I love the colours you have used.
ReplyDeleteSuper, you're progressing very well with the lovely blanket!! It will become gorgeous ♥
ReplyDeleteWelldone, this is going to be an amazing blanket! X
ReplyDeleteExcellent tutorial! I can read patterns and don't usually need a tutorial but I like to see how others teach. You have done a really nice job with this!
ReplyDeleteI am doing a Lark's foot blanket, which is similar accept that it has DCs and EDCs. Very nicely done tutorial and I love your choice of colors. :)
ReplyDeleteGORGEOUS! wow, what an amazing blanket, wish I had a source for even decent acrylic yarn near me and I would start one too.....will have to wait for a trip somewhere this summer I guess, sigh. Thanks for sharing on Craft Schooling Sunday!
ReplyDeleteOh my! Where do you live?!?! NO YARN :-0
DeleteI love this stitch. That "rice" row feels like a secret-y surprise! Is that weird? Thank you for sharing!!!!
DeleteThank you for that, I shall try this when I have finished my V stitch blanket..x
Delete… enjoy crocheting !!!! ;oD
Deletexxxxx Ale
What a great turorial Alessandra.Love your colors so happy looking.
ReplyDeleteThanks so much for sharing this with us. I Bookmarked your sight.
Thanks so much and happt crocheting.
Yoka
I love the look of this pattern. It is nice you are willing to share. Can't wait to start one. How many chains did you use for your blanket and approx. size. Thank you,Peggy
ReplyDeleteGorgeous, I have shared on my blog. www.funkyfabrixonline.blogspot.com
ReplyDeleteE brava la mia sorellona! Great job!
ReplyDeleteE brava la mia sorellona! Keep up with the great job! =)
ReplyDeleteThanks for sharing.
ReplyDeletegreat instructions, lovely results.
ReplyDeleteThans for a great instrukction - it has been well taken care of..:-)
ReplyDeleteHi, thank you very much for sharing...can you extend it as much as you want just by rounding up and adding 2? Like starting with 60 and chaining 2? Thanks again, Dawn
ReplyDeleteThis is far and away the best explanation I've seen of any crochet stitch. I've written a few crochet tutorials myself and how long it took you to take such detailed photos and annotate them. You've taught me a new stitch technique as well as given all of us a lesson on how to write a tutorial. Thank you for both.
ReplyDeleteI love this pattern. I followed your detailed instructions which were perfect and am about half way thru making a baby blanket. Just wondering did you finish yours and how did you finish off the side edges - did you sew in all those different colored tails? I am thinking of doing some sort of fringed edge instead. Stacey.
ReplyDeleteHi Stacey!!!
ReplyDeleteMy blanket is still on the hook, But I have to say that I really love your idea to use fringes!!!
Thank you for lovely comment and for following the pattern,
xxxx Ale
What a lovely pattern and your tutorial is very simple to follow. Well done to you. It's on my to do list!
ReplyDeleteI have lots of ideas for this stitch! A scarf, a pillow and a baby blanket! Thanks for the very detail tutorial! Very easy to follow!
ReplyDeleteThis is so very pretty I was looking for a simple pattern for an afghan and I think this is beautiful
ReplyDelete@anonymous : thank you!!!! xxxx Ale
ReplyDeleteThanks for sharing the tutorial. I've done several block stitch projects, but didn't think of starting with the loopy chain like you did. Your blanket is lovely. :D
ReplyDeleteYou are really welcome Hani !!!!!
ReplyDeletexxxxx Ale
Great tutorial, nice stitch, thanks, I have pinned it to remember :) have a nice evening and up to 2014:)
ReplyDeletewery intresting to folloy your work, and this wasn´t so bad I taught in my mind, so now I´ve gott a new hobby. Tank you so very much.
ReplyDelete@Anonymous : you are really welcome !!!!!
ReplyDeletexxxxx Ale
I noticed in the pattern you chained two for the anchor row...where as the lady you got the pattern from did 3. Does it make the difference?
ReplyDelete@ Rachel : No difference at all Rachel!!!! I think that if you use a very thick yarn it's preferable to chain 3, but not necessary!!!!
ReplyDeletexxxxxx Ale
I get it!!! I get it!!! Yea!!! I finally get it! I have looked at this pattern in lots of pics & love it!!! Now, I get it... have a few afghans in front of this, but will be doing this one - for me - soon!!! :)
ReplyDeleteThank you!!!
~Tess
Happy to know that you got it!!!!!
DeletePlease, show me your work whenever you like!!!!!
thank you, xxxxxx Ale
I will, but it'll be a while... Finishing the 2 afghans left from my being in hospital in Oct-Nov 2013... Had 3, now working the 2 simultaneously...working border around one... almost ready to start border on the 2nd. Granddaughters will be thrilled :) Then I have one more to make for my daughter... THEN, I can start on mine... have a STASH box that I'll be using!!!
Deletebusy bee!!!!!!! ;oD
Deletexxxxxxx Ale
Wow! That is a BEAUTIFUL blanket! And the tutorial is really easy to follow. I've got three friends who are all due babies shortly so I've been looking for a pattern to quickly whip up some more blankets and I think this will be perfect. And it really appeals to my sense of colourplay - I love that you swop each colour before you get a chance to become bored it!
ReplyDeleteThank you xx
I found your blog over a year after this blanket was posted, sorry to be so late to the party! Your blog is lovely, the blanket gorgeous, I love the way you use color. But a little confusion here... The chart shows a turning chain at each end of the rows, but the tutorial indicates that after the first row, you go back and begin each row from the same end, thereby working always from the right side. Is that right? And the chart should be read always from the right, omiting the turning chains? Or perhaps (very likely, actually) I am misreading something?
ReplyDeleteThanks,
Susan
Hi Susan!!!!! Thank you for writing to me !!!!
DeleteProbably the pictures are more clear for you, instead of the chart!!! There are no turning chains at the end of a row, but just a long chain useful to attach the next row! You are right when you notice that you always work from the right side : that's because you change colour each row ! You read the chart always from right to left !!!!!
xxxxxxx Ale
Hi Alessandra, I have a problem, in the foundation row, it says "chain 2 +1sc in the 7th chain from hook. Repeat chain 2 +1 sc till the end..." I don't understand, do you skip the next 6 and do the sc in the seventh from the hook again? because when I chain 2 and do 1 sc in the next chain the row curls and won't stay straight... Please advise, and thank you in advance!! Once I get past this part I may have a question about the chain 20 part... lol
ReplyDeleteMy blanket is not squared at the ends, it is veering off at an angle. Is here anyway I can fix this?
ReplyDeleteI would like to know that also... mine is veering horribly
DeleteHello girls !!!
Deletethe only thing that I'm thinking of is problem of tension ….. so I'm asking : which level are you with crocheting? If you are beginners, try to work on little samples as exercise and see if after crocheting some of them you can notice an improvement!
xxxxxx Ale
I wish you could do the star stitch like that i always get stuck after doing the hdc in last stitch and then turn and then you do a sc in the hdc , mine goes wrong every time . you made a great job with your photo's and i love your block blanket.
ReplyDeleteThe afghan is beautiful. Thank you for sharing.
ReplyDeletevery interesting, are the instructions available in german, too?
ReplyDeleteNo, sorry !!!! At least not written by me ! ;oD
Deletexxxxxx Ale
Hi. I am new to crocheting and am going to make this blanket. What kind of yarn should I use? I have no idea. Can you please help me with that? Thank you for the great photos!
ReplyDeleteLora
Hi Lora !!!
DeleteYou can choose any yarn you like (acrylic, cotton, wool or any blend) in any thickness you prefer and then the right hook size once you have chosen the yarn you feel right for this project ! Please be aware that if you are a beginner, you may have some problems with the tension and your blanket-to-be could be not coming out as you wish ….. To start with this pattern, I suggest you to crochet some samples before you start your big project !!!! ;oD
Enjoy crocheting, xxxx Ale
The instructions for this pattern are very well done. I am teaching some ladies at the library in my town and some are really getting very good. Some still need help. Most have trouble with understanding the instructions but this written, pictures and graph are perfect for everyone. Even me. Thank you for a wonderful tutorial.
ReplyDeleteI'm so happy to hear all that, thank you my dear!!!!
DeleteHope you all will have fun in crocheting this pattern!!!!!
Happy weekend, xxxxx Ale
thanks a lot,
ReplyDeleteI created a blanket for my Little daughter.
you can see at my blog:
http://babalamami.blogspot.de/2014/12/julias-bunte-kuscheldecke-nach.html
Sorry for my late reply, but I just come back from holidays!!!!
Deletethank you for letting me know about your blanket!!!!
xxxxx Ale
Thank you, for sharing your blanket project is great.
ReplyDeleteYou are more than welcome!!!!!
Deletexxxxxx Ale
hi,
ReplyDeleteI started with th next blanket ... in White / Grey and black for my great daughter ...
http://babalamami.blogspot.de/2015/02/coole-hakeldecke-fur-babsi-nur-noch-120.html
Babalamami Claudia
Thanks so much for the easy explanation for this GORGEOUS blanket!
ReplyDeleteyou are more than welcome, Amanda!!!!!!
Deletexxxxxx Ale
hello,
ReplyDeleteI finished my second blanket, I justwanted to Show it to you:
http://babalamami.blogspot.de/2015/03/hakeldecke-fur-babsi-endlich-fertig.html
best wishes
Claudia
Thanks so much for the tutorial on the block stitch. Do you happen to know of a tutorial for crocheting the block stitch in the round plus increases/decreases? Your blanket is so pretty & colorful!
ReplyDeleteyou are more than welcome Gigi !!! If you are interested to crochet the block stitch in the round, just have a look here :http://busyfingersbusylife.blogspot.nl/2013/07/pattern-rosetta.html or here :http://busyfingersbusylife.blogspot.nl/2013/06/pattern-granny-flower-circle-rug.html
DeleteHope these links are what you are looking for!!!
xxxxx Ale
Also just found this. Thank you for a fabulous pattern.
ReplyDeleteWorking on this blanket right now but what did you use as a border? I have woven in the ends and cut the tails short.
ReplyDeleteReally like how this pattern is working up. I have woven in the ends and clipped the ends short. What do you suggest for a border?
ReplyDeletehi Shari!
DeleteI suggest you to have a look here :http://homemadeatmyplace.blogspot.com/2014/03/i-present-you-my-globetrotter-blanket.html
.... then, let me know!!!
xxxx Ale
thank you so much for the tutorial......Mahalo and God Bless
ReplyDeleteyou are welcome,
Deletexxxx Ale
THANK YOU FOR SHOWING ME THIS . IT IS A BEAUTIFUL PATTERN
ReplyDeleteHi Alessandra
ReplyDeleteLove your blanket pattern. I'm a beginner. Please let me know if the number of foundation chain is the length of the blanket that I want. From yr picture, 19chain is small. Can I add to the required length that I want or do i follow your length and then joint it together to form a big blanket for bed.
Thanks
Halijah
Hi Halijah,
Deleteobviously the sample given in this post is a small one and the foundation chain is not realistic for a blanket ! ;oD
Anyway, I suggest you to read some other posts about my blanket, as they are really useful to give you an idea of the actual project !
Please, read :
http://homemadeatmyplace.blogspot.com/2013/05/my-first-big-crochet-project.html
http://homemadeatmyplace.blogspot.com/2014/03/i-present-you-my-globetrotter-blanket.html
http://homemadeatmyplace.blogspot.com/2014/03/my-blanket.html
Hope you'll find what you need !!!
xxxx Alesandra
Hi Alesandra, I am working this pattern and have fourteen colors plus the rice colors. I am wondering if you rotated the color order or stayed with the same sequence as the one pictured. Did you simply repeat the sequence seen in the picture? This is a beautiful afghan and very easy to work. Lovely tutorial too.
ReplyDeleteHi!!!
DeleteWhen working on this blanket, I was trying to follow a colour sequence, but I was using my yarn stash, so when a colour ended I simply started to use a new one, which could be different from the original I was using!!! Honestly there are no rules to follow, just your heart!!!
Have fun crocheting, xxxx Ale